-
You MUST read the Babiato Rules before making your first post otherwise you may get permanent warning points or a permanent Ban.
Our resources on Babiato Forum are CLEAN and SAFE. So you can use them for development and testing purposes. If your are on Windows and have an antivirus that alerts you about a possible infection: Know it's a false positive because all scripts are double checked by our experts. We advise you to add Babiato to trusted sites/sources or disable your antivirus momentarily while downloading a resource. "Enjoy your presence on Babiato"
How to add ajax product filter
- Thread starter vinu
- Start date
You are using an out of date browser. It may not display this or other websites correctly.
You should upgrade or use an alternative browser.
You should upgrade or use an alternative browser.
you can search for Themify WooCommerce Products Filter in the usual plugins area of WordPress
Install and activate the plugin to begin.
Once this initial stage is completed you’ll see a new Product Filters area in the dashboard. You can create a new filter name in this section. I’ve called mine “Shoptimizer Filters” but feel free to name it anything you like.

Note that on this dashboard it creates a custom shortcode which we’ll need to reference later in order to display these filters.
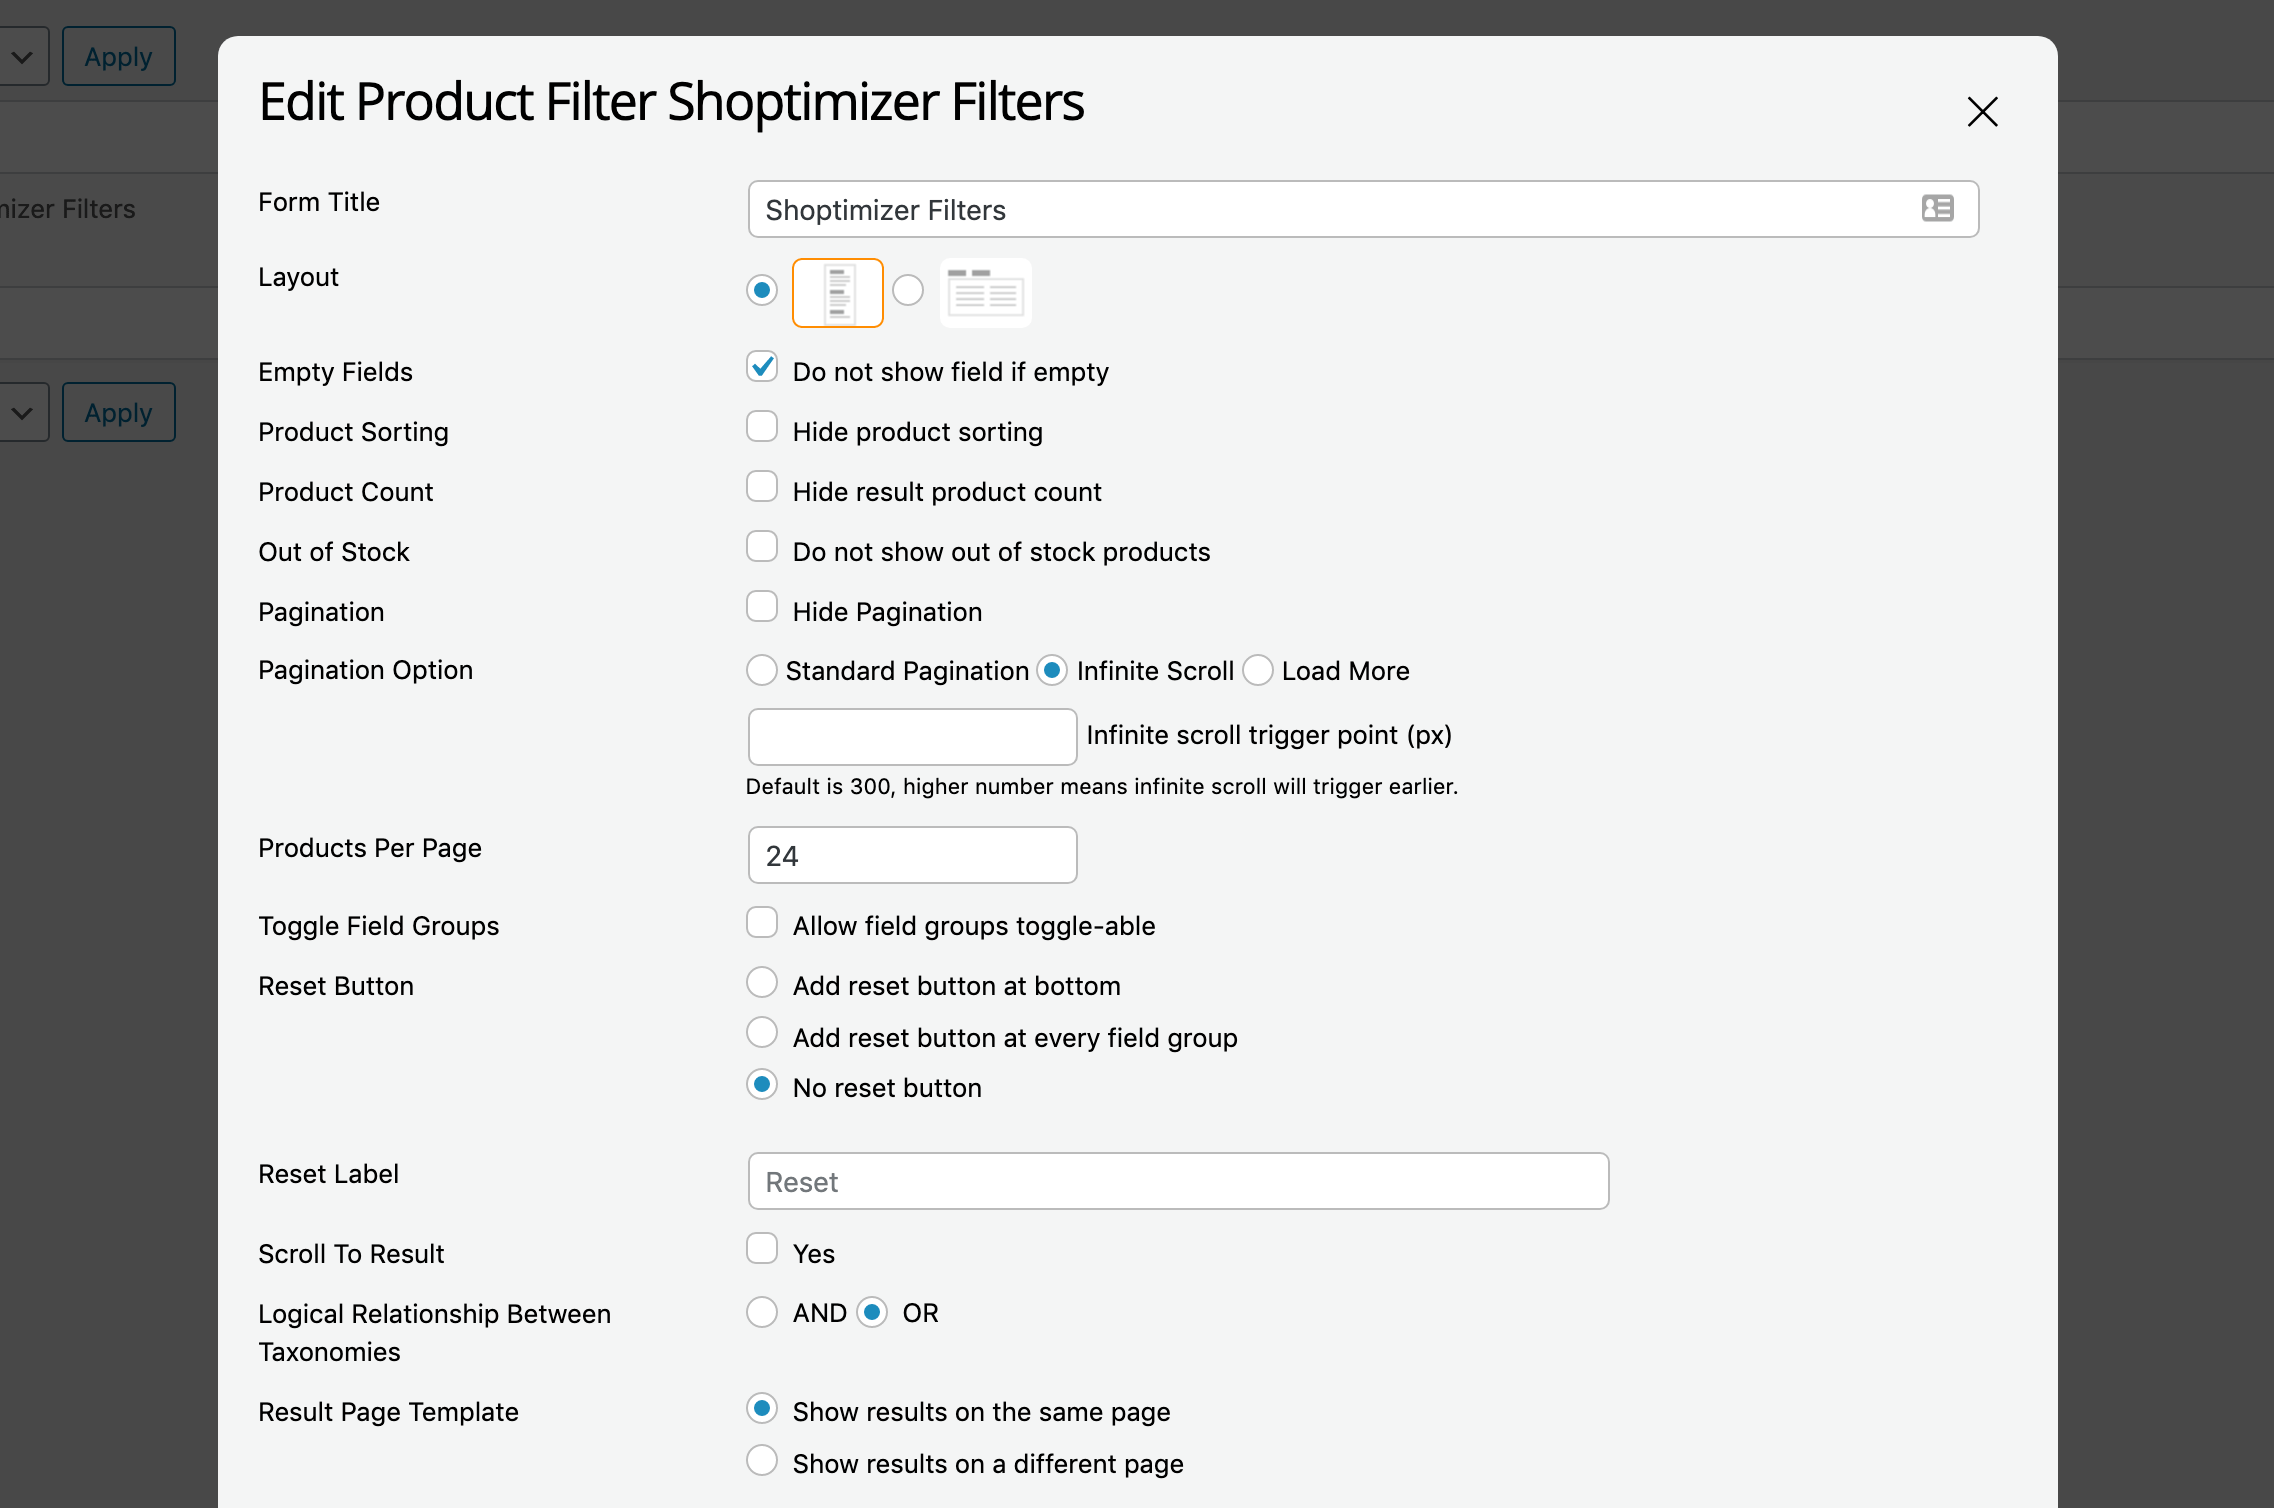
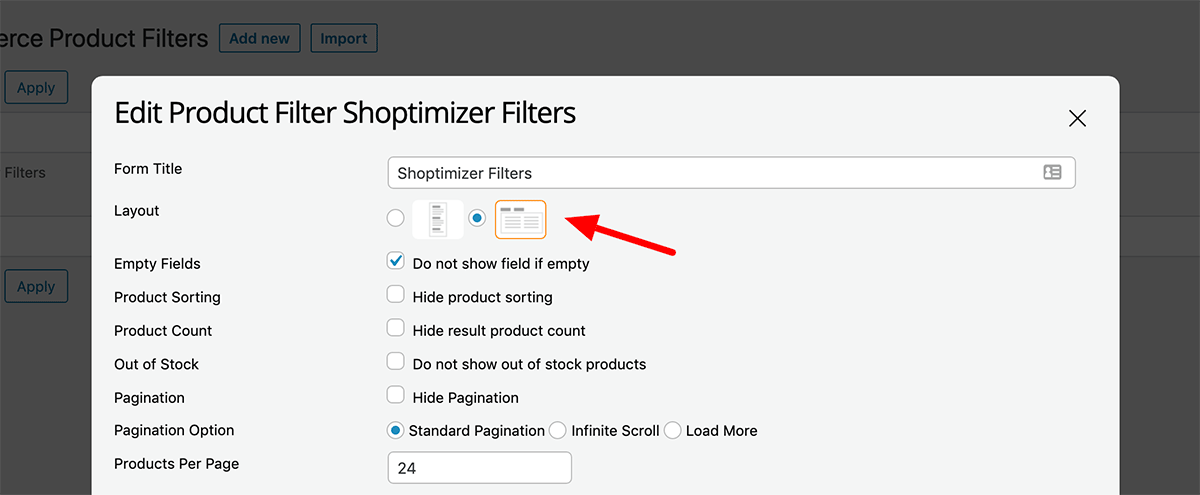
The first setting is whether to have a vertical or horizontal layout.
I’m going to set up a vertical widget area first.
The one setting you need to watch out for is the Products Per Page input field. This cannot be empty!
This should match your configuration in your WooCommerce settings, i.e. Appearance > Customize > WooCommerce > Product Catalog. If you are displaying 3 items per row, and 8 rows per page, then this should be set to 24.
I have ‘Standard Pagination’ selected, but the plugin also supports infinite scroll and displaying a Load More button which is pretty neat.
You can drag and drop the filters you want to display from the button blocks into the rows below. As well as any custom attributes you have created (such as color and size), it includes filters for:
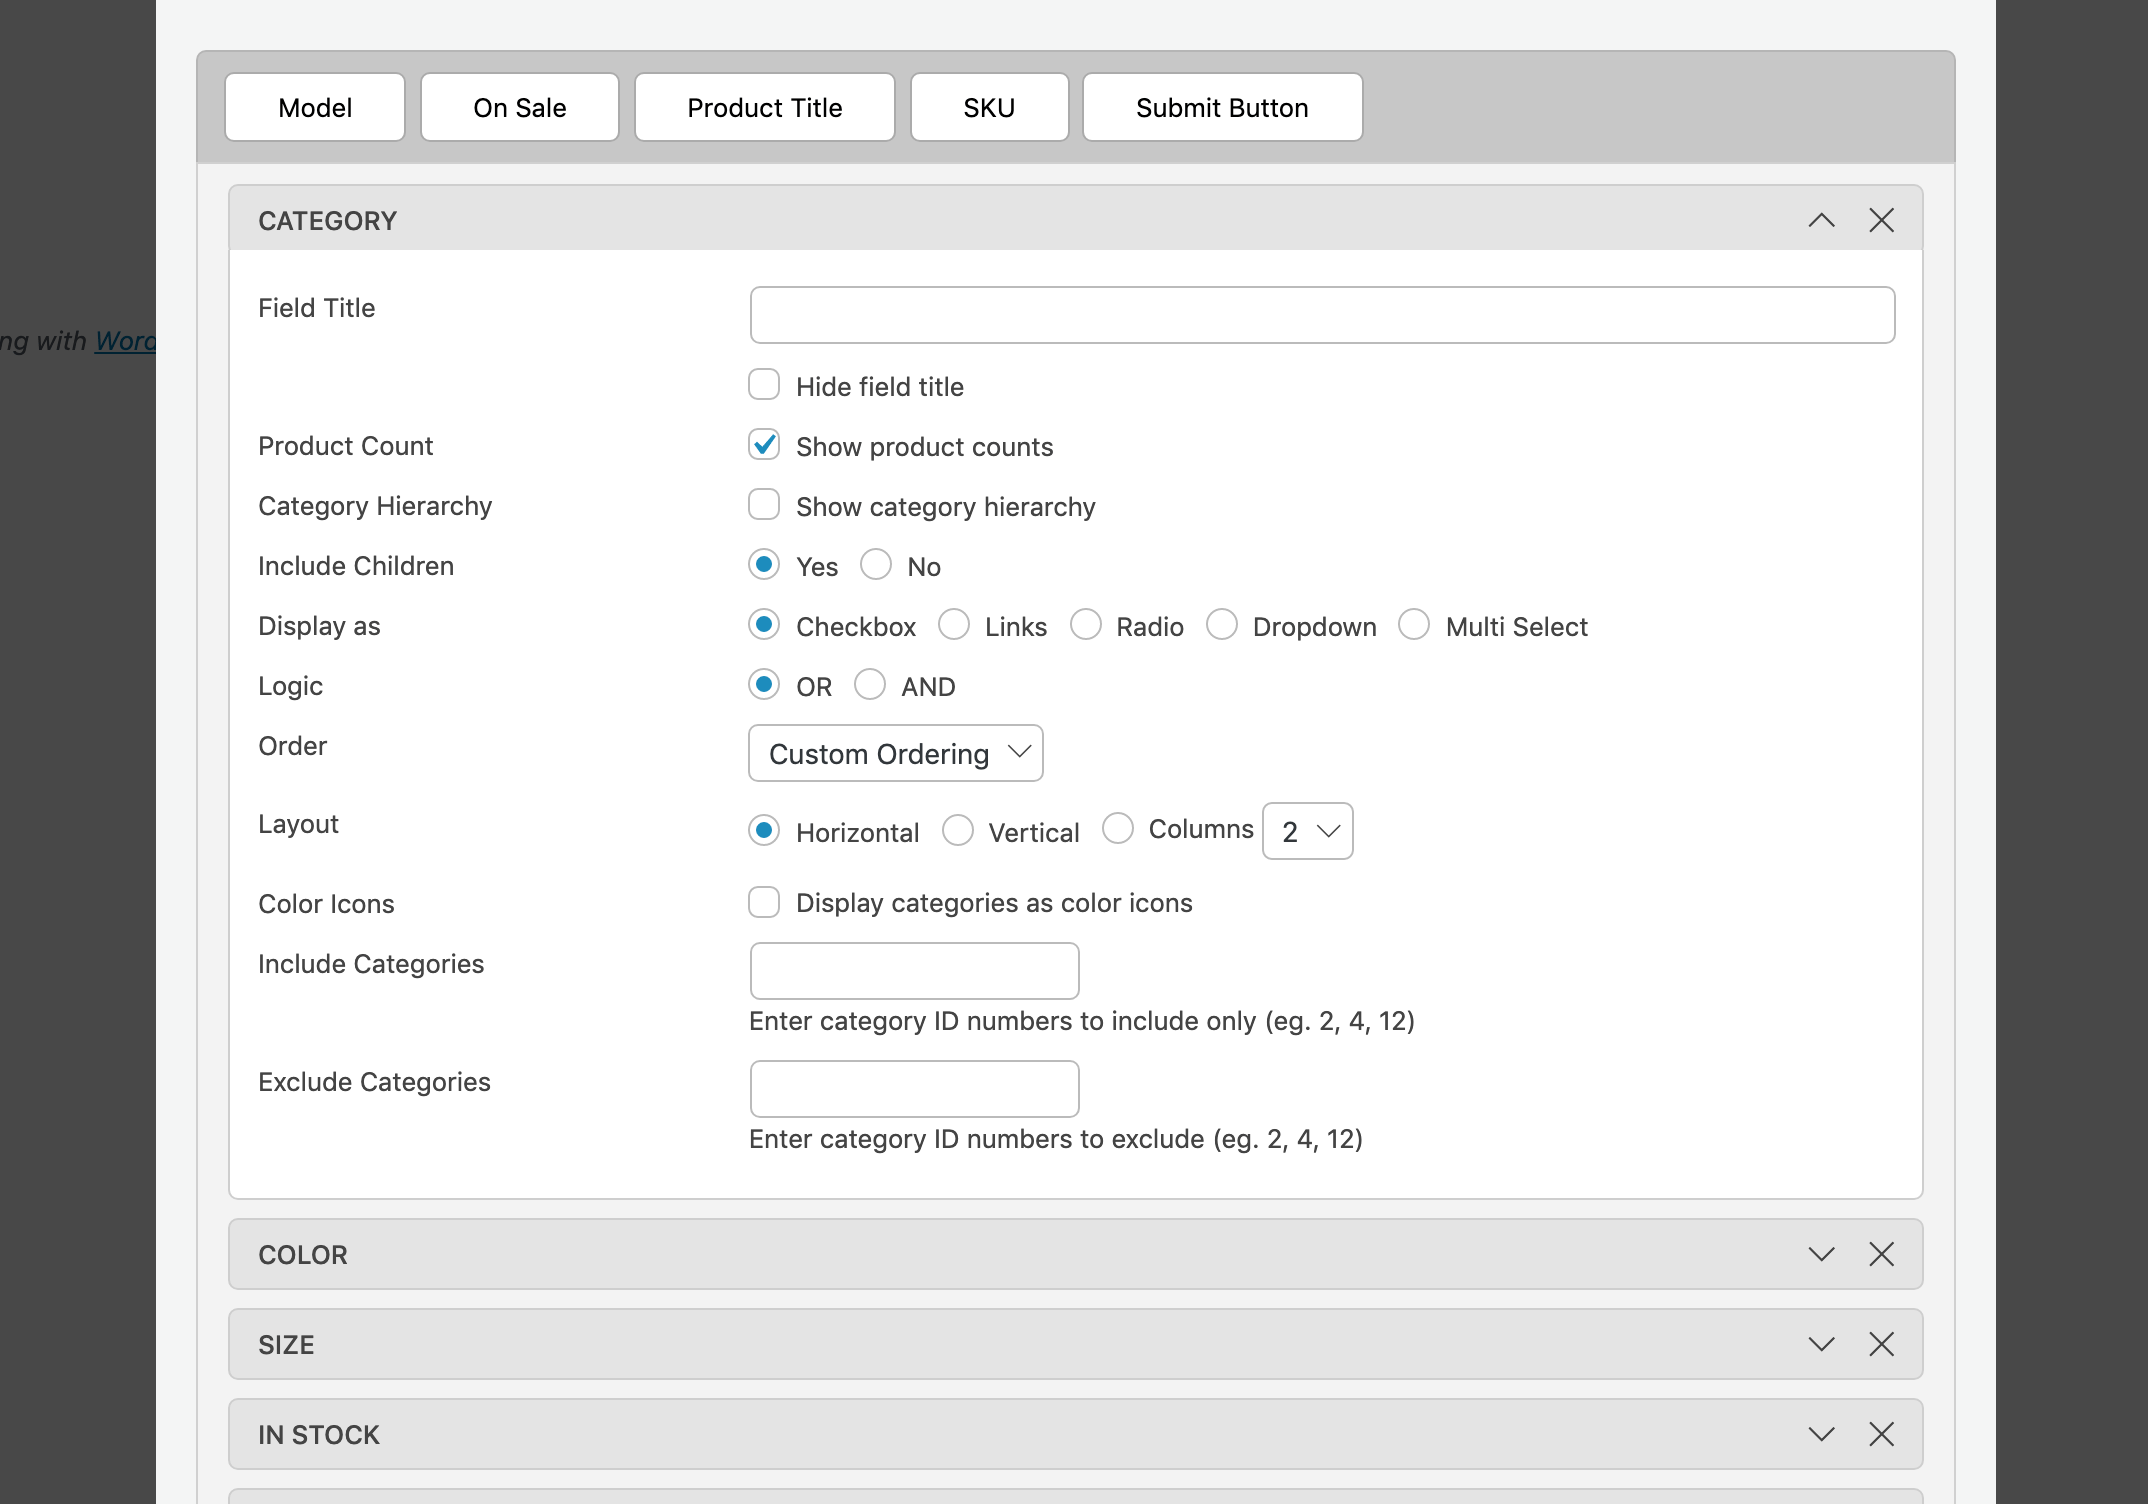
Once you’ve dragged a filter down, you can expand it to review a host of additional configuration options. These include displaying a particular filter as:
If you’ve chosen a color attribute you’ll also get a separate series of options where you can assign a swatch color to each option. You can even upload a background image which is great if you have say different pattern choices for your products.
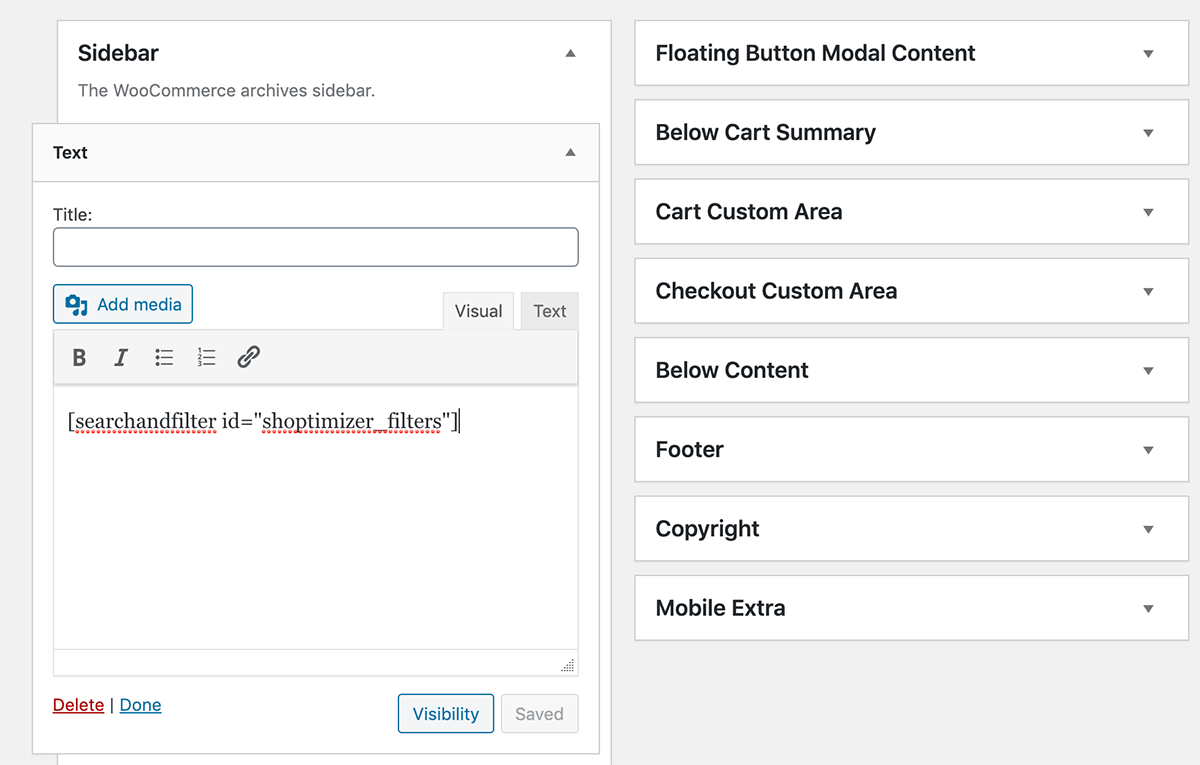 Adding a filters text widget with the shortcode
We can use the shortcode created in Step 1 and drop it into a simple text widget within our Sidebar widget area. After that, if we refresh our Shop page we should see our new sidebar filters.
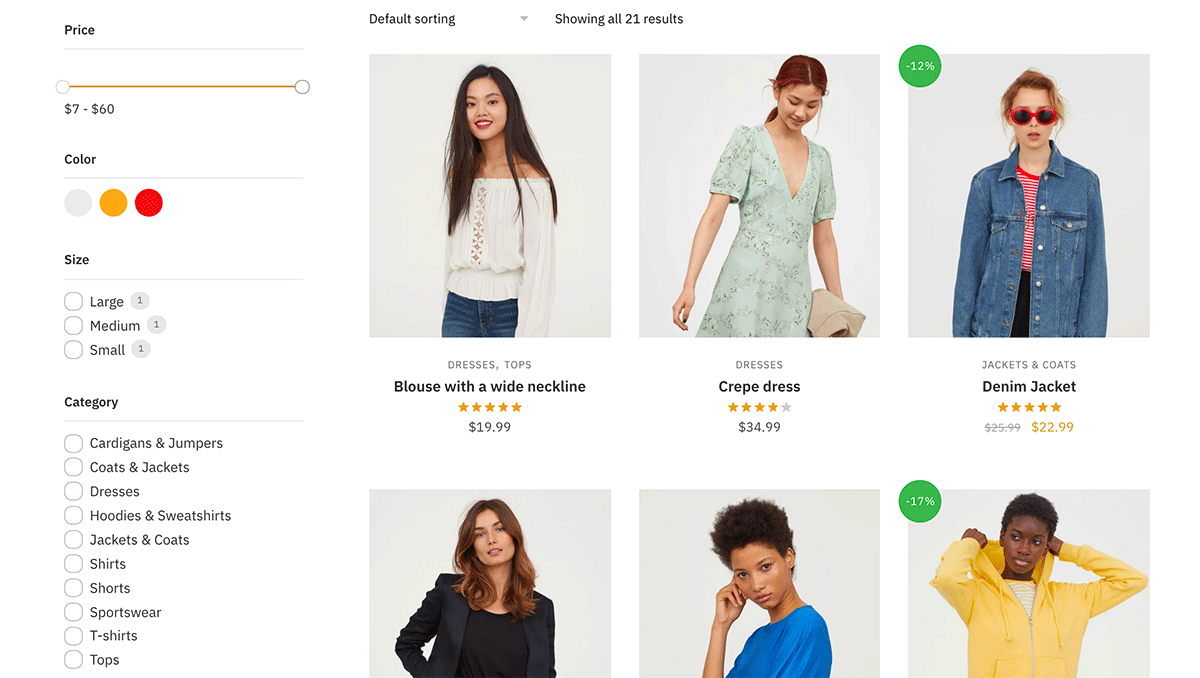
The nice thing about this, compared to the WooCommerce default widget filters is the results set automatically updates when a filter has been selected.
One small tweak I made was change the price filter bar color from purple to orange which better matched my store. I used a line of CSS to achieve this.
Next, you can delete the sidebar widget previously added as we don’t need that anymore.
We’re actually going to also remove the sidebar completely as we’d like the filters to stretch the full width of the content container. In Shoptimizer you can do this within: Appearance > Customize > Layout > Sidebars – and set ‘WooCommerce Sidebar’ to ‘None’.
If you’re using a different theme you’d need to contact the theme author for instructions on how to remove the Shop sidebar.
To make things look a bit more balanced, we can also increase the number of items appearing per row to 4. You can do this within: Appearance > Customize > WooCommerce > Product Catalog.
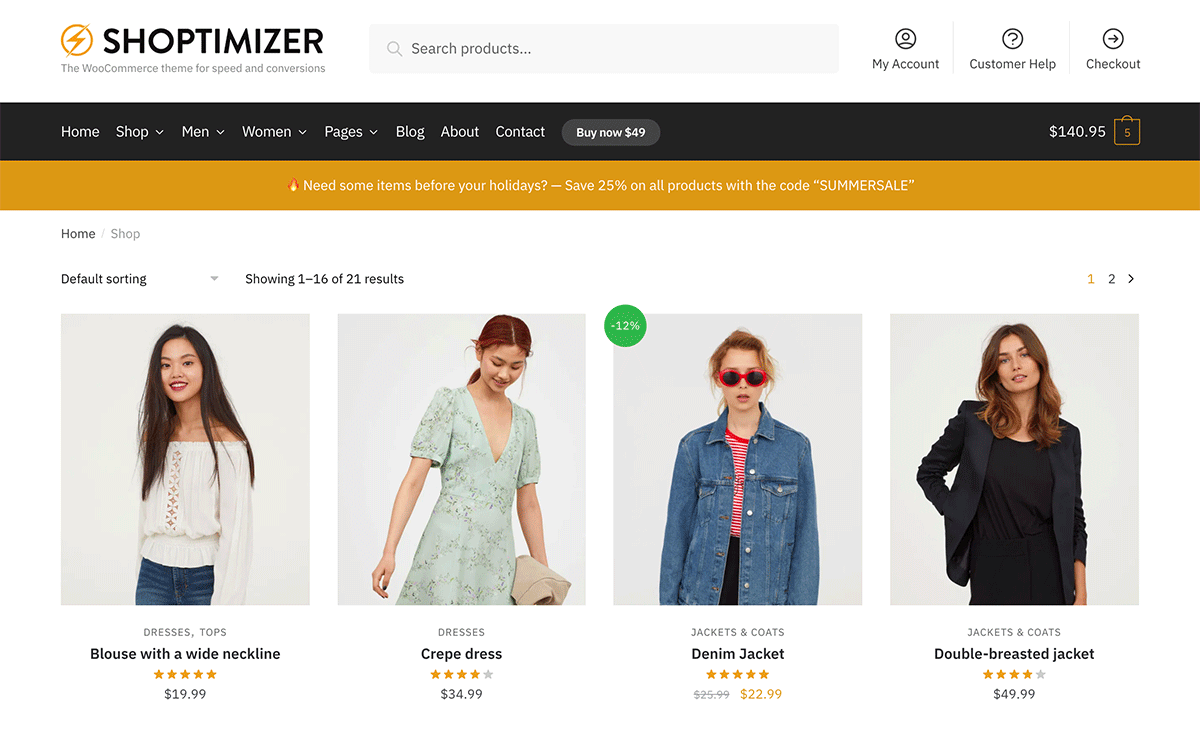
So after doing that we’ll have a shop page with no sidebar, but also with no filters, despite choosing the horizontal layout.
 Full width Shop page with no sidebars – but where are our filters?
Why is this? Well we haven’t added the shortcode yet. And unlike the sidebar widget area, there isn’t an obvious place to put this. So we’ll have to use one of the standard WooCommerce hooks and add it that way.
Within a child theme’s functions.php file, or via the Code Snippets plugin, we’ll need to include the following simple bit of code.
We’ve created a custom function called shoptimizer_custom_filters (you can change the naming if you like) and are hooking it into the woocommerce_before_shop_loop location which will display it before the products.
You’ll notice I’m using the same shortcode as I used earlier for the widget.
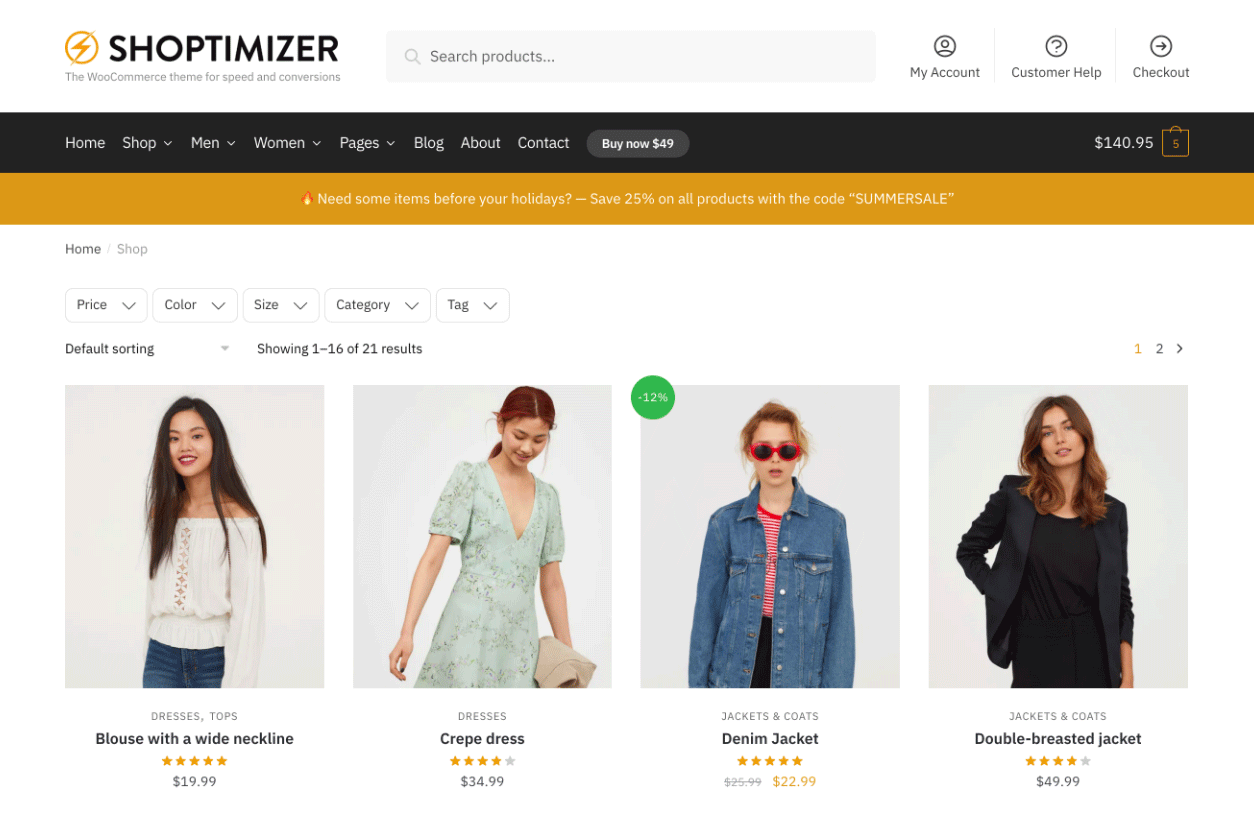
Now, when we refresh the Shop page we should see the horizontal filters appear.
 Horizontal filters now appear on the Shop page
Success! We have our horizontal widgets, and without a sidebar, our products are much more prominent.
Install and activate the plugin to begin.
Once this initial stage is completed you’ll see a new Product Filters area in the dashboard. You can create a new filter name in this section. I’ve called mine “Shoptimizer Filters” but feel free to name it anything you like.

Note that on this dashboard it creates a custom shortcode which we’ll need to reference later in order to display these filters.
Step 2. Configure the layout options
When you edit the filter you’ve just created, you’ll see a modal window with all of the options followed by a section to set up your filters. Let’s look at the options first.
The first setting is whether to have a vertical or horizontal layout.
I’m going to set up a vertical widget area first.
The one setting you need to watch out for is the Products Per Page input field. This cannot be empty!
This should match your configuration in your WooCommerce settings, i.e. Appearance > Customize > WooCommerce > Product Catalog. If you are displaying 3 items per row, and 8 rows per page, then this should be set to 24.
I have ‘Standard Pagination’ selected, but the plugin also supports infinite scroll and displaying a Load More button which is pretty neat.
Step 3: Create your filters
The bit at the bottom of the same modal window is where you create your filters. I thought this was quite intuitive compared to some other implementations I came across.You can drag and drop the filters you want to display from the button blocks into the rows below. As well as any custom attributes you have created (such as color and size), it includes filters for:
- Product SKUs (pretty handy for certain catalogs)
- In Stock Items
- Product Categories
- Sale items
- Price (with more configurability than the default Woo one)
- Product Tags

Once you’ve dragged a filter down, you can expand it to review a host of additional configuration options. These include displaying a particular filter as:
- Checkboxes
- Links
- Radio buttons
- A dropdown
- Or, a multi select
If you’ve chosen a color attribute you’ll also get a separate series of options where you can assign a swatch color to each option. You can even upload a background image which is great if you have say different pattern choices for your products.
Step 4: Display the filters in the sidebar
Firstly, we’ll display our new filters in our sidebar, much like we did before with the default WooCommerce widgets.
We can use the shortcode created in Step 1 and drop it into a simple text widget within our Sidebar widget area. After that, if we refresh our Shop page we should see our new sidebar filters.

The nice thing about this, compared to the WooCommerce default widget filters is the results set automatically updates when a filter has been selected.
One small tweak I made was change the price filter bar color from purple to orange which better matched my store. I used a line of CSS to achieve this.
| 1 2 3 | .wpf_slider.ui-slider .ui-widget-header { background-color: #dc9814; } |
Step 5: Display horizontal filters
Let’s change the style of these filters to horizontal ones. So first go back into the plugin options and change the layout to horizontal.
Next, you can delete the sidebar widget previously added as we don’t need that anymore.
We’re actually going to also remove the sidebar completely as we’d like the filters to stretch the full width of the content container. In Shoptimizer you can do this within: Appearance > Customize > Layout > Sidebars – and set ‘WooCommerce Sidebar’ to ‘None’.
If you’re using a different theme you’d need to contact the theme author for instructions on how to remove the Shop sidebar.
To make things look a bit more balanced, we can also increase the number of items appearing per row to 4. You can do this within: Appearance > Customize > WooCommerce > Product Catalog.
So after doing that we’ll have a shop page with no sidebar, but also with no filters, despite choosing the horizontal layout.

Why is this? Well we haven’t added the shortcode yet. And unlike the sidebar widget area, there isn’t an obvious place to put this. So we’ll have to use one of the standard WooCommerce hooks and add it that way.
Within a child theme’s functions.php file, or via the Code Snippets plugin, we’ll need to include the following simple bit of code.
| 1 2 3 4 5 | add_action( 'woocommerce_before_shop_loop', 'shoptimizer_custom_filters', 5 ); function shoptimizer_custom_filters() { echo do_shortcode('[searchandfilter id="shoptimizer_filters"]'); } |
You’ll notice I’m using the same shortcode as I used earlier for the widget.
Now, when we refresh the Shop page we should see the horizontal filters appear.

Success! We have our horizontal widgets, and without a sidebar, our products are much more prominent.
you can search for Themify WooCommerce Products Filter in the usual plugins area of WordPress
Install and activate the plugin to begin.
Once this initial stage is completed you’ll see a new Product Filters area in the dashboard. You can create a new filter name in this section. I’ve called mine “Shoptimizer Filters” but feel free to name it anything you like.

Note that on this dashboard it creates a custom shortcode which we’ll need to reference later in order to display these filters.
Step 2. Configure the layout options
When you edit the filter you’ve just created, you’ll see a modal window with all of the options followed by a section to set up your filters. Let’s look at the options first.

The first setting is whether to have a vertical or horizontal layout.
I’m going to set up a vertical widget area first.
The one setting you need to watch out for is the Products Per Page input field. This cannot be empty!
This should match your configuration in your WooCommerce settings, i.e. Appearance > Customize > WooCommerce > Product Catalog. If you are displaying 3 items per row, and 8 rows per page, then this should be set to 24.
I have ‘Standard Pagination’ selected, but the plugin also supports infinite scroll and displaying a Load More button which is pretty neat.
Step 3: Create your filters
The bit at the bottom of the same modal window is where you create your filters. I thought this was quite intuitive compared to some other implementations I came across.
You can drag and drop the filters you want to display from the button blocks into the rows below. As well as any custom attributes you have created (such as color and size), it includes filters for:
- Product SKUs (pretty handy for certain catalogs)
- In Stock Items
- Product Categories
- Sale items
- Price (with more configurability than the default Woo one)
- Product Tags

Once you’ve dragged a filter down, you can expand it to review a host of additional configuration options. These include displaying a particular filter as:
So you have lots of choices in how you want to display your filters. You can also exclude certain categories by ID which is a useful feature for store owners.
- Checkboxes
- Links
- Radio buttons
- A dropdown
- Or, a multi select
If you’ve chosen a color attribute you’ll also get a separate series of options where you can assign a swatch color to each option. You can even upload a background image which is great if you have say different pattern choices for your products.
Step 4: Display the filters in the sidebar
Firstly, we’ll display our new filters in our sidebar, much like we did before with the default WooCommerce widgets.
Adding a filters text widget with the shortcode
We can use the shortcode created in Step 1 and drop it into a simple text widget within our Sidebar widget area. After that, if we refresh our Shop page we should see our new sidebar filters.

The nice thing about this, compared to the WooCommerce default widget filters is the results set automatically updates when a filter has been selected.
One small tweak I made was change the price filter bar color from purple to orange which better matched my store. I used a line of CSS to achieve this.
1
2
3.wpf_slider.ui-slider .ui-widget-header {
background-color: #dc9814;
}
Step 5: Display horizontal filters
Let’s change the style of these filters to horizontal ones. So first go back into the plugin options and change the layout to horizontal.

Next, you can delete the sidebar widget previously added as we don’t need that anymore.
We’re actually going to also remove the sidebar completely as we’d like the filters to stretch the full width of the content container. In Shoptimizer you can do this within: Appearance > Customize > Layout > Sidebars – and set ‘WooCommerce Sidebar’ to ‘None’.
If you’re using a different theme you’d need to contact the theme author for instructions on how to remove the Shop sidebar.
To make things look a bit more balanced, we can also increase the number of items appearing per row to 4. You can do this within: Appearance > Customize > WooCommerce > Product Catalog.
So after doing that we’ll have a shop page with no sidebar, but also with no filters, despite choosing the horizontal layout.
Full width Shop page with no sidebars – but where are our filters?
Why is this? Well we haven’t added the shortcode yet. And unlike the sidebar widget area, there isn’t an obvious place to put this. So we’ll have to use one of the standard WooCommerce hooks and add it that way.
Within a child theme’s functions.php file, or via the Code Snippets plugin, we’ll need to include the following simple bit of code.
We’ve created a custom function called shoptimizer_custom_filters (you can change the naming if you like) and are hooking it into the woocommerce_before_shop_loop location which will display it before the products.
1
2
3
4
5add_action( 'woocommerce_before_shop_loop', 'shoptimizer_custom_filters', 5 );
function shoptimizer_custom_filters() {
echo do_shortcode('[searchandfilter id="shoptimizer_filters"]');
}
You’ll notice I’m using the same shortcode as I used earlier for the widget.
Now, when we refresh the Shop page we should see the horizontal filters appear.
Horizontal filters now appear on the Shop page
Success! We have our horizontal widgets, and without a sidebar, our products are much more prominent.
Thanks a lot
source here
Code:
https://www.commercegurus.com/product-filters-woocommerce/Similar threads
- Replies
- 4
- Views
- 588
- Replies
- 7
- Views
- 593
- Replies
- 0
- Views
- 340
- Replies
- 0
- Views
- 148


