• You MUST read the Babiato Rules before making your first post otherwise you may get permanent warning points or a permanent Ban.

    Our resources on Babiato Forum are CLEAN and SAFE. So you can use them for development and testing purposes. If your are on Windows and have an antivirus that alerts you about a possible infection: Know it's a false positive because all scripts are double checked by our experts. We advise you to add Babiato to trusted sites/sources or disable your antivirus momentarily while downloading a resource. "Enjoy your presence on Babiato"

Need help recreating 2 layouts through elementor

xeric

Member
Apr 5, 2019
98
25
18
Hi everyone.

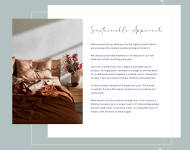
I need some help in recreating 2 specific layouts using elementor. Theme I'm using is JupiterX.

First Layout:
1614617029522.png

For this one I was thinking I make a section with 2 columns. Make column 1 be 30% width and column 2 be 70% width. Set image in column 1 and set background color and padding in column 2 to make sure text is placed in correct position.

Then for the offset box outline, I was thinking of making a duplicate section below this. Set column 1 to be empty and set a border color on column 2 and move section 2 using negative margins to make it appear above section 1.

Is there a better way of going about this?


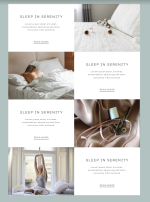
Second,
1614617257750.png

I want to create this kind of an alternating layout for blog posts. The posts should be automatically updated. The solution I can think of right now for this is to set up the posts manually but that will be very tiresome to maintain.

Appreciate any help that you guys can give on this.

Thanks.
 
@xeric I would suggest you to introduce yourself to the community. As almost everyone around is helpful they kinda don't like to deal with strangers.

@medw1311 quoting you here for your awesome skills: do you want an apprentice?
 
  • Like
Reactions: Medw1311
@xeric I would suggest you to introduce yourself to the community. As almost everyone around is helpful they kinda don't like to deal with strangers.

@medw1311 quoting you here for your awesome skills: do you want an apprentice?

Sure steele i'll make a post in the introduction section
 
@xeric I would suggest you to introduce yourself to the community. As almost everyone around is helpful they kinda don't like to deal with strangers.

@medw1311 quoting you here for your awesome skills: do you want an apprentice?
I'll come back to this when I've caught up with every thing else.
 
  • Love
Reactions: Mr G
The second example is simple to do:

In Elementor, choose the 'Posts' widget and set it to:
Skin: Classic
Columns: 1
Posts per Page: 4 (or whatever number you want)
Image Position: Right
Image Width: 50%

In 'Advanced' give it a css class, e.g. 'alternating'

In Custom CSS add this:

CSS:
.alternating article:nth-child(even){
    flex-direction: row-reverse;
}
.alternating article:nth-child(even) .elementor-post__thumbnail__link {
    margin-left:0!important;margin-right:20px!important;
}

(In my quick and dirty example I had to use 'important'. Of course you should always try to avoid that, but I'm too lazy to find out the complete CSS trail to override in Elementor, which by the way is probably different in your case. That's the main issue I have with this page builder: the endless nested elements and the associated CSS trails, terrible!)

Anyway, the above is, as said, a quick and dirty example but it should get you going.
 
Last edited:
  • Like
Reactions: xeric
Thanks for the quick solutions frizzel.
Overlapping columns is exactly how I was thinking of doing the first one.
And for the second, I never even thought of doing it with CSS so I appreciate the insight.
 
The second example is simple to do:

In Elementor, choose the 'Posts' widget and set it to:
Skin: Classic
Columns: 1
Posts per Page: 4 (or whatever number you want)
Image Position: Right
Image Width: 50%

In 'Advanced' give it a css class, e.g. 'alternating'

In Custom CSS add this:

CSS:
.alternating article:nth-child(even){
    flex-direction: row-reverse;
}
.alternating article:nth-child(even) .elementor-post__thumbnail__link {
    margin-left:0!important;margin-right:20px!important;
}

(In my quick and dirty example I had to use 'important'. Of course you should always try to avoid that, but I'm too lazy to find out the complete CSS trail to override in Elementor, which by the way is probably different in your case. That's the main issue I have with this page builder: the endless nested elements and the associated CSS trails, terrible!)

Anyway, the above is, as said, a quick and dirty example but it should get you going.

Sorry to bother you again but a slight modification to this design has left me scratching my head. I managed to do the earlier design perfectly but in this new one, I can't manage to "unset" the image out of the container to give it the hover effect.

1615274725305.png

If I try to add a margin-top to the image or try to change the spacing of the featured image using the posts settings on the left, instead of knocking the image out of the container, it just adds space to the top, which makes sense but is not the look I'm trying to achieve.

1615274899338.png

I'm just not sure what CSS or other setting I'm missing to achieve the look of the image hovering over the bg and would appreciate any help.

Thanks
 
To make content flowing outside their containers visible, you first must override the default setting for that, in this case with the following CSS:

CSS:
.elementor-posts--skin-classic .elementor-post {
    overflow: visible
}

To push the image outside the container you can do something like this:

CSS:
.elementor-post__thumbnail {
    margin: -25px 25px 25px -25px
}

That's for an image on the left. Of course you need to alternate these margin settings for odd and even posts. For an image on the right, it would be something like:

CSS:
.elementor-post__thumbnail {
    margin: -25px -25px 25px 25px
}
 
Last edited:
  • Like
Reactions: xeric
To make content flowing outside their containers visible, you first must override the default setting for that, in this case with the following CSS:

CSS:
.elementor-posts--skin-classic .elementor-post {
    overflow: visible
}

To push the image outside the container you can do something like this:

CSS:
.elementor-post__thumbnail {
    margin: -25px 25px 25px -25px
}

That's for an image on the left. Of course you need to alternate these margin settings for odd and even posts. For an image on the right, it would be something like:

CSS:
.elementor-post__thumbnail {
    margin: -25px -25px 25px 25px
}
Can't believe it was as simple as just setting the overflow. Thanks once again mate, really appreciate it.
 
AdBlock Detected

We get it, advertisements are annoying!

However in order to keep our huge array of resources free of charge we need to generate income from ads so to use the site you will need to turn off your adblocker.

If you'd like to have an ad free experience you can become a Babiato Lover by donating as little as $5 per month. Click on the Donate menu tab for more info.

I've Disabled AdBlock