• You MUST read the Babiato Rules before making your first post otherwise you may get permanent warning points or a permanent Ban.

    Our resources on Babiato Forum are CLEAN and SAFE. So you can use them for development and testing purposes. If your are on Windows and have an antivirus that alerts you about a possible infection: Know it's a false positive because all scripts are double checked by our experts. We advise you to add Babiato to trusted sites/sources or disable your antivirus momentarily while downloading a resource. "Enjoy your presence on Babiato"

How to create custom blog page in Astra Pro?

xeric

Member
Apr 5, 2019
98
25
18
Hi everyone.

I'm using Astra Pro theme and was trying to create a custom blog layout.

This is the layout I'm trying to create but can't really figure out how to do it.

There's a couple of things im not too sure about. First is that red line under the image.

By the looks of it I need to somehow insert that red line as an image but I don't know where to even begin to try to create this layout.

Should I use the posts widget by elementor? Will I need any other plugin?
If I use the posts widget, how do I insert the red line below the image? Maybe by CSS instead of an image but how would I create this red line using CSS?

Would appreciate any help.
Thanks everyone.

1621712613572.png
 
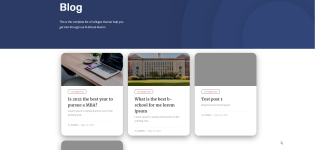
This is where I managed to get so far.

Used the The Plus addons post widget to achieve this. Still missing the red line.

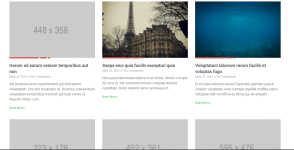
1621714825297.png


Second method I've achieved is this one using elementor pro default posts widget, again missing the red line.
The most logical implementation of it that I can think of is using CSS but I'm not really sure how to create it using just CSS.

1621715224450.png

Also completely lost on how to set up the filter system as well. I was thinking Jet Smart Filters or this https://wordpress.org/plugins/search-filter/ but styling them both according to the mockup might be difficult
 
One idea that I have had is maybe I can get the class of the image and use something like class:affer with content set to " " and position absolute but I'm still not sure how to create the 'broken' red line. I can create the first part just fine. But the 2 extra red parts mess me up.

Maybe I can use multiple class:after? One for each part of the line.
 
It would help to have a link to your example.

For the 'broken line' you should look into the possibilities of svg vector graphics and the stroke-dasharray attribute as explained here: https://developer.mozilla.org/en-US/docs/Web/SVG/Attribute/stroke-dasharray

A live editor is here: https://gigacore.github.io/demos/svg-stroke-dasharray-generator/
As always, Thank you so much frizzel. But that seems a bit too convoluted/advanced for me. I tried reading the docs and using the editor but I feel like I would end up wasting too much time trying out this Implementation.

I have another idea for the implementation but might run into issues with responsiveness. Will only know after I try it out.

I was thinking of creating the red dashed line as a png and using something like this

.image-class:after {
content: "";
background: url("/imageurl") no-repeat;
top: 20%;
right: 0px;
position: absolute;
display: inline-block;
}

Do you think something like this could work?

Edit: sorry missed the first part of your reply. Link is admitexpert.com/blog
 
Last edited:
Working with an svg is not difficult at all. Consider this svg code:

SVG:
<svg version="1.1" xmlns="http://www.w3.org/2000/svg" xmlns:xlink="http://www.w3.org/1999/xlink" x="0px" y="0px" xml:space="preserve">
    <line stroke-dasharray="50%, 4%, 10%, 4%, 2%" x1="0" y1="5" x2="70%" y2="5" stroke="#d35145" stroke-width="5" stroke-linecap="round"></line>
</svg>

(Copy this in a text-editor like Notepad++ and save with extension .svg)
  • stroke-dasharray is line with a color followed by white space, followed by line with a color etc., so in this case the colored lines are 50%, 10% and 2% with two whitespaces of 4%.
  • x1 and x2 are the left and right positions of the svg line. I've set the right at 70% to prevent the dashes repeating.
  • stroke="#d35145" speaks for itself: it's the color you want your line to be.
  • stroke-width is of course how 'thick' you want your line. Make sure the y1 and y2 values are set to the same value.
And then in your CSS:

CSS:
.elementor-posts-container .elementor-post__thumbnail__link::before {
    content: url(images/test2.svg);
    width: 100%;
    height: 5px;
    position: absolute;
    bottom: 0;
    z-index: 99;
}

The above code was put in the style.css of an astra-child theme where the svg was uploaded to a folder under the child theme called 'images'.

With an svg as content in a pseudo-element like '::before' makes it impossible to adjust any svg attributes such as stroke width, stroke color etc., which is possible when an svg is an inline element.
 
  • Like
Reactions: xeric
Working with an svg is not difficult at all. Consider this svg code:

SVG:
<svg version="1.1" xmlns="http://www.w3.org/2000/svg" xmlns:xlink="http://www.w3.org/1999/xlink" x="0px" y="0px" xml:space="preserve">
    <line stroke-dasharray="50%, 4%, 10%, 4%, 2%" x1="0" y1="5" x2="70%" y2="5" stroke="#d35145" stroke-width="5" stroke-linecap="round"></line>
</svg>

(Copy this in a text-editor like Notepad++ and save with extension .svg)
  • stroke-dasharray is line with a color followed by white space, followed by line with a color etc., so in this case the colored lines are 50%, 10% and 2% with two whitespaces of 4%.
  • x1 and x2 are the left and right positions of the svg line. I've set the right at 70% to prevent the dashes repeating.
  • stroke="#d35145" speaks for itself: it's the color you want your line to be.
  • stroke-width is of course how 'thick' you want your line. Make sure the y1 and y2 values are set to the same value.
And then in your CSS:

CSS:
.elementor-posts-container .elementor-post__thumbnail__link::before {
    content: url(images/test2.svg);
    width: 100%;
    height: 5px;
    position: absolute;
    bottom: 0;
    z-index: 99;
}

The above code was put in the style.css of an astra-child theme where the svg was uploaded to a folder under the child theme called 'images'.

With an svg as content in a pseudo-element like '::before' makes it impossible to adjust any svg attributes such as stroke width, stroke color etc., which is possible when an svg is an inline element.
Thank you so much for taking the time out to explain it to me. I really appreciate all the help I've gotten from you. And you explain it in such a clear and concise way. I've learned stuff from you that I had no idea how to do.

Thanks :)
 
AdBlock Detected

We get it, advertisements are annoying!

However in order to keep our huge array of resources free of charge we need to generate income from ads so to use the site you will need to turn off your adblocker.

If you'd like to have an ad free experience you can become a Babiato Lover by donating as little as $5 per month. Click on the Donate menu tab for more info.

I've Disabled AdBlock